Showing posts with label Adminstration. Show all posts
How to Define Group Item in SAP Business One

How to Define Group Item in SAP Business One

 To make it easier when searching for goods, usually do grouping for existing items. Grouping can be made from many categories such as categories of raw materials, finished goods, or groups based on how the goods appear in the sales catalog. In SAP Business One, it is possible to create new item groups to help us categorize goods. The way to create an Item Group is:

  1. On the SAP Business One main menu, select Administration> Setup> Inventory> Item Group, or on the main menu, in the search field type Item Groups.
  2. Enter the name of the newest Item Group that you want to create.
  3. Select the Deafult UoM Group.
  4. Select the appropriate Planning Method.
  5. Select the Procurement Method (Procurement Method). Here you have to determine the method of procuring the goods, whether they are self-produced or purchased from other parties.
    If the Procurement Method is Buy, then you can enter the Minimum Order Qty information (the minimum quantity to make a purchase from the vendor if the stock of goods is close to the minimum quantity for the order)
  6. Enter the Lead Time days (the number of days from the time the item was ordered to the time it was received or produced).
  7. Optional: enter Tolerance Days if needed to give a grace period for goods received or produced from Lead Time
  8. Select Default Valuation Method:
    - Moving Average - this method is based on calculating the average cost for the item in each sale and purchase transaction.
    - Standard - standardization of prices in the system which requires charging a fixed price that will be used for all transactions.
    - FIFO - a permutation of the perpetual inventory system in which goods purchased first are sold first, regardless of actual inventory transactions.
  9. Save by clicking the Add button.

Form Settings Authorization SAP B1

Form Settings Authorization SAP B1


form settings authorization sap b1 change or add to table formats and settings. on the UI screen.

Form Setting Setup
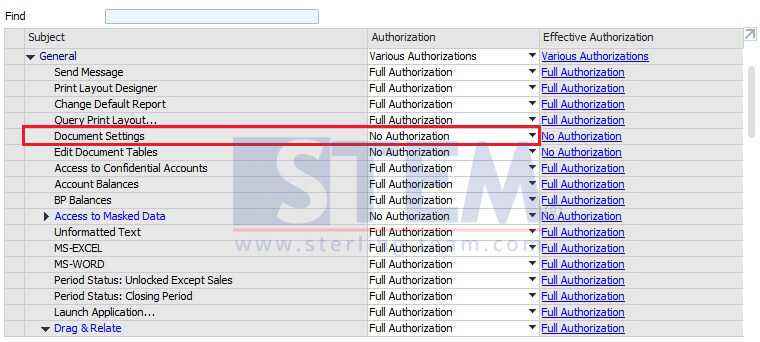
To block user access to the Form Settings feature in most menu windows in SAP Business One (except the Main Menu): Please open the menu: Administration → System Initialization → Authorization → General Authorization.
Set User Authorization for Form Setting Access on SAP Business One
Select the user you want to set from the list of users on the left, then open General → Document Settings, and set the authorization to "No Authorization".

And go to display the Form Settings will also be disabled.
Change Purchasing Document System Message Warning to Error

Change Purchasing Document System Message Warning to Error

Change Purchasing Document System Message Warning to Error


  1. Enter into the SPRO T-Code
  2. Select SAP IMG Reference
  3.  Then go to Material Management -> Purchasing -> Environment Data -> Define Attributes of System Messages.
  4. Then search according to the application area and No Messages after that, change the System Message Category from W (warning) to E (Error). The example in the picture below is for Application area 06 and message no. 028 with the information Purchase order date is in the past, so if you want to change the following message that initially warning to an error do as shown below.

Thus this article may be useful😀
Make the Confirm Pop-Up Message from the Document Reappear

Make the Confirm Pop-Up Message from the Document Reappear

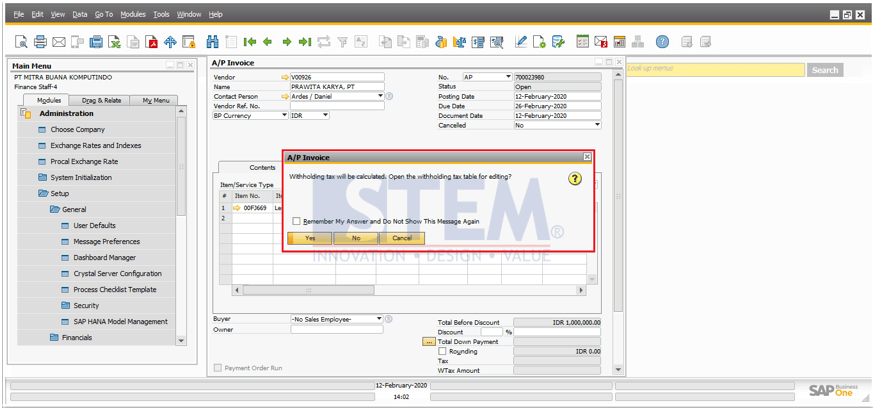
Have you ever accidentally checked the checkbox on a pop-up message that appears during system operation in SAP Business One? Usually the pop-up is to notify the user that there are some changes made in a document. What happens when you check the checkbox, is that for the next document, the pop-up will no longer appear. The following is an example of a pop-up message in the A / P Invoice document:
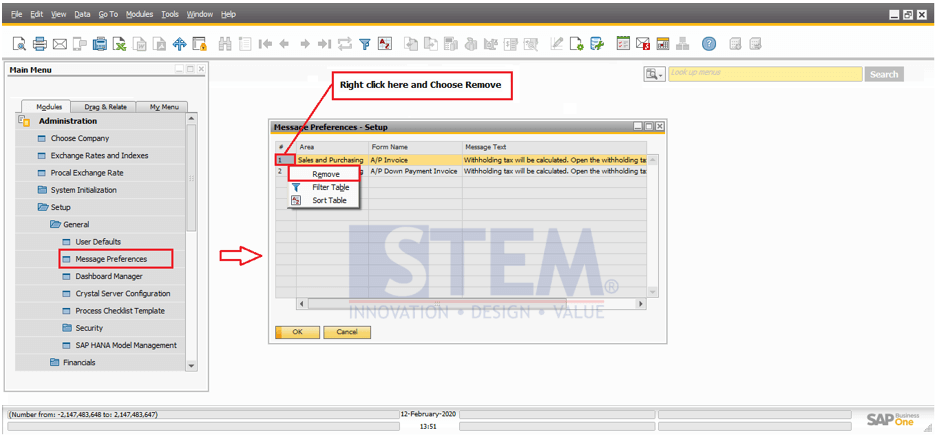
To make the pop-up message reappear, you can set it through the menu:

Administration> Setup> General> Message Preferences.

You can choose via the Form name and then remove it to make the message pop up appear.
How to view SAP Business One Document Layout Before Printing?

How to view SAP Business One Document Layout Before Printing?

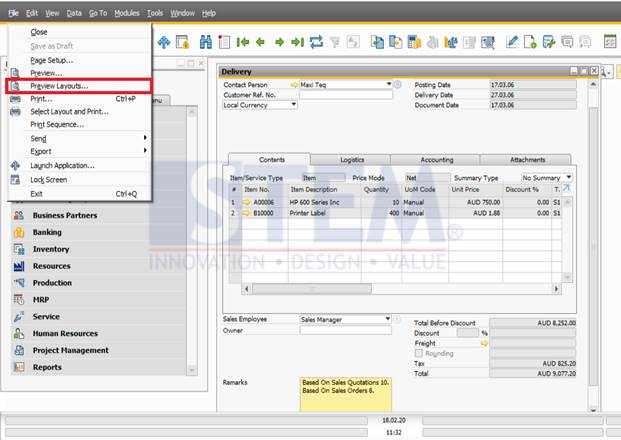
What if you have more than one document layout available for printing on SAP Business One, and you want to check which is the most suitable for that specific document? Yeah, it's that simple! Display the document and from the File menu select the "Preview Layouts" option:
SAP Business One Tips - Preview Document Layout
SAP Business One Tips – Preview Document Layout
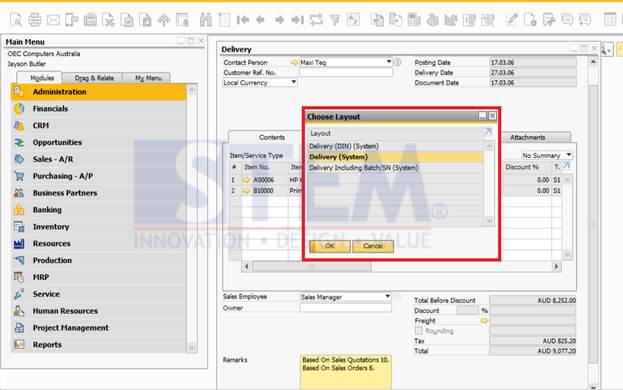
And in the window that appears next, select the layout you want to see and click OK.
SAP Business One Tips - Preview Document Layout
SAP Business One Tips – Choose Layout
The preview is displayed in the selected layout without having to make any changes in the default layout settings. We can display previews in all relevant document layouts. After we find the most suitable one for the document, we can print it by clicking the printer icon on the toolbar or, close the preview and select the "Select Layout and Print" option from the File menu.
Cash Discount on Payment Terms

Cash Discount on Payment Terms

In a business, there are several ways to increase cash inflows to the company, one of which is by offering offers to customers and luring them to make early payments. Frequently used offers are special discounts for customers who make early payments.
In SAP Business One, these settings can be set automatically using Payment Terms.
Payment terms can be accessed in the Administration menu -> Setup -> Business Partner -> Payment Terms
To make the Setup, follow these steps:
  1. Create Payment Terms
  2. Define Base Due Date
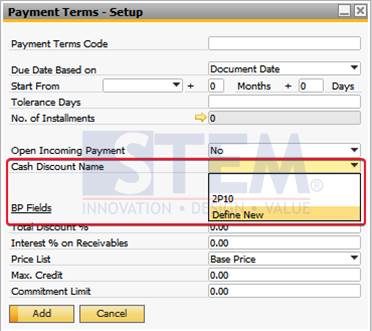
  3. Select Define New in the Cash Discount Name
    SAP Business One TIps - Cash Discount in Payment Terms
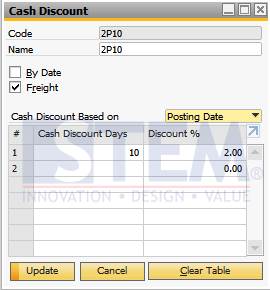
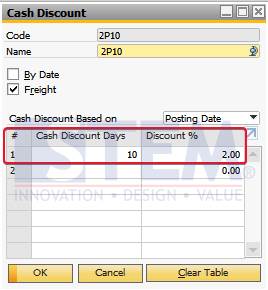
  4. Give Code and Name on the Cash Discount
    SAP Business One TIps - Cash Discount in Payment Terms
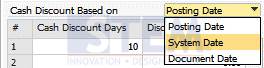
  5. Determine the Base Discount for the Cash Discount from which date
    SAP Business One TIps - Cash Discount in Payment Terms
  6. Determine what the discount calculation is like. Example (Within 10 days after posting a Date, it can disc 2%). You can also add other discounts on different days.
    SAP Business One TIps - Cash Discount in Payment Terms
  7. After completing the Cash Discount mechanism, you can then select the Cash Discount that has been made.
  8. After that, Select Update so that the Payment Term created is saved.
If the Payment terms setup has been made, then we can arrange the Invoice / Business Partner document which is indeed applied to the payment terms policy.
In the example setting above, the payment term applies when the invoice is paid on or before the 10th day after the invoice is posted. Discount does not apply if the invoice is more than 10 days old.
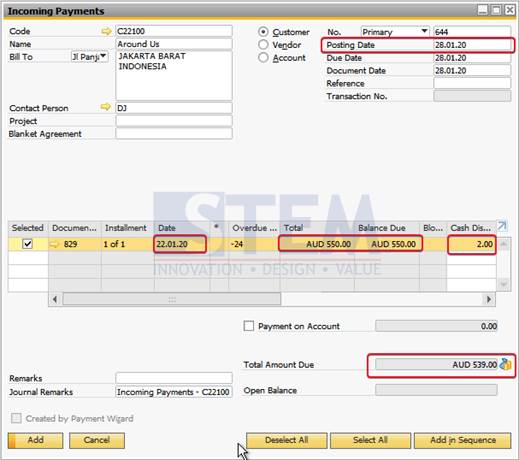
The following is an example attached when an invoice payment is made before the 10th day of the Posting Date made on the invoice:
SAP Business One TIps - Cash Discount in Payment Terms
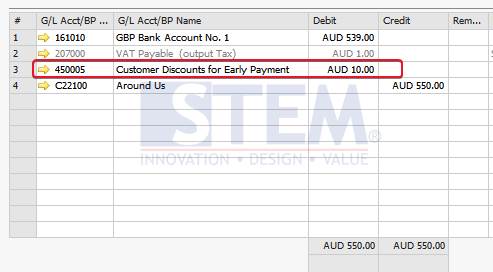
By making early payments, customers get a discounted discount. The following are the journal posting results from the payment:SAP Business One TIps - Cash Discount in Payment Terms
General Setting SAP Business One

General Setting SAP Business One

Administration-System initialization-General Setting

General Setting SAP B1

Has several parts, namely :
1. BP (Business Partner)
In this section you can give a warning to the sales document. With several parameters that must be set, namely
Check whether adding a sales document to the customer causes a deviation from the credit limit set for the customer (Payment Terms tab in the Master Data Business Partner window).
  • Credit limit, Provides a warning when making a sales transaction for a customer who has deviated from a predetermined credit limit (in the Setup in the Payment Partner Business Data Master Data tab)
    • The credit limit provided includes payment using a current account, even though it is not yet liquid
  • Commitment Limit, gives a warning when making a sales transaction if the customer has exceeded the credit limit agreed at the beginning. See the Payment Term Section that is on the Business Partner Master Data form
    • The Commitment Limit given does not include payment using a Giro
Alert for Limit which can be used in SAP only for transactions such as

  • AR Invoice
  • Delivery
  • Sales Order
  • Pick List

Default Payment Term for Customer: Default for the Duration given to the Customer

Default Payment Term for Vendor: Default for the Duration given to Supplier

Activate Approval Procedures: If you want to run the Approval process, you must provide a check mark during the initial configuration. Because it cannot be updated again if there is a transaction

Display Inactive Business Partner In Reports: Keep displaying the Customer / Supplier List in Standard SAP reports even though the Customer / Supplier has been deactivated

Inactive Display Business Partner In Marketing Documents: Keep showing Customer / Supplier List in SAP Marketing reports even though the Customer / Supplier has been disabled

2. Budget 


Block Deviation from Budget, Block transactions because the budget has exceeded the limit
Warning, Give a warning if the budget has exceeded the limit. you can continue the transaction or cancel it.

Without Warning, there is no limit whatsoever when the budget exceeds the limit
In giving a warning / block on Transactions Can be selected based on the For Annual Budget Or For Monthly Budget.

Transactions that can be displayed warning messages are transactions Purchase Order, Receipt PO, Invoice (Accounting)

3. Services


Perform Data check, Check data for each user when logging in and display messages if there is inconsistent data

Open Exchange Rates Table, Displays the Master exchange rate when making transactions with foreign currencies that are up to date

Display Recurring Postings on Execution, Displays Recurring Posts on today's date. Used if the post is run repeatedly

Send Alert for Activities Scheduled for Today, SAP Business One will immediately send a list of all activities that must be done today and can directly process this activity

Display Inbox When New Message Arrives, Displays messages every time there is a new message. Settings are done per user

Open Window for Credit Voucher Ref. Update, when logging in this form will open automatically. Previously it must determine the planning interval for the due date. (Per User)

Open Postdated Checks Window, When Logging In An automatic message will appear that contains a check that is due. (Per User)

4. Display


Language: Change of language per company for all users
Skin Style: Display type used, re-login to see the results
Color: Gives background color to the form
Time Format: The time format used for display in transactions
Date Format: Date format used for display in transactions
Separator: Format Separator date
Decimal Place: Specifies how many decimal digits are used

5. Font Background


Determine the Font and background you want to use


6. Path : Specifies the file storage location in the form of an attachment


7. Inventory / Stock


This section consists of 2 parts, namely item and planning


  • Item:
    • Defines a method for managing inventory (Batch Or Serial number)
      • On Every transaction: Every time there is a stock transaction
      • On Release Only: only inventory transactions are released
    • Specifies the Default Warehouse
    • Determining the G / L Stock Method
  • Planning
    • Used if you want to run MRP where you have to define when sales are used against future sales

Exchange Rate Difference SAP Business One

Exchange Rate Difference SAP Business One

Here's how to make Exchange Rate Difference

Administration è Exchange Rate Difference

Revaluation Currency is used for vendors or customers and GL Accounts whose balance is in a foreign currency or multy currency. The function is to recognize the existence of profit / loss due to changes in exchange rates. In the Reval process, JE will be formed, which will be reversed automatically at the beginning of the following month.

To do Revaluation what must be done is to change the End of Month Rate
* If the revalence process is complete, change the rate to the original rate.
After the Rate has been filled click the Update button. then you have created the Exchange Rate.
Module Administration SAP Business One

Module Administration SAP Business One

When Starting a System From SAP Business One, the Company usually has to make a Blueprint first, assisted by an SAP Partner to determine the pattern and settings that will be used when the SAP B1 Application is run.

Inside this module stores all information about the Company and information on all users who use this system. As

  • Currency Exchange Rate
  • Authorization and alerts
  • Approval procedure
  • Internal email
  • Access information from Non SAP software by using the export and import functions
Module Administration


if you are already curious about what the contents of the module administration are, let's look in more detail at this module

Choose Company
User Code
- Specifies the username to log in

Password
- Enter your password

Change User
- Clean the User Code and password fields and re-login.

Current Server
- Select Server MS_SQL2005 or MS_SQL2008

Company Or Current User
- Displays all company databases defined on the server


Company Name
- Display the name of the company

Database Name
- Displays the database name that was previously created in the server

localization
- indicates the location of the Company used in SAP Business One

Version
- Display the version of the Database

New
- Creating a New Database on the server

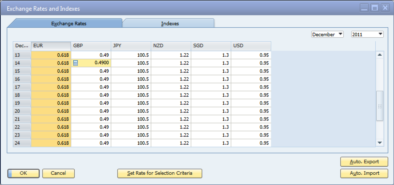
Exchange Rate And indexes
There is only 1 Rate that can be used on SAP Business One. You can use the 1/2 BI Rate / Rate Rate Depending on Company Needs

Set up Early Year at Sap Business One

Set up Early Year at Sap Business One

The following way to Things to Look For To Setup Early Years Sap Business One is

1. Making Period Indicators

Administration - Setup Financial - Period Indicator
Used to identify Transactions per Period, usually setup per year depending on needs


2. Period Post Making

Administration - System Initialization - Posting Period
 usually setup per year depending on needs

3. Setup Document Numbering

Administration - System Initialization - Document Numbering
For usually setup per year depending on needs

4. Setup the default series per document

Administration - System Initialization - Document Numbering

What if Document uses Series Per Group Authorization ???

So what must be considered is

1. Make sure you have setup for authorization per user

If you have several Series in 1 transaction document that is separated per Group according to location. Used to display the series used by users per group that is set up
As an example

01JAWA enter Group 1
02JAWA enter Group 1
01SMTRA goes to Group 2
02SMTRA goes to Group 2

And for Andi users categorized into Group 1, then when Andi logged into SBO and opened the document it was only visible
Series 01JAWA, and 02JAWA

And for the user manager Categorized into Group 1 and 2 then when Andi logged into SBO and opened the document it was only visible
Series 01JAWA, 02JAWA, 01SMTRA, 02SMTRA

From the explanation above, you can see the picture below to make it easier to understand, just give authorization to the group you need.

Note:

  • Only Professional Licenses can do this setup.
  • Setup is done only once when you first use SBO.

  • Administration - System Initialization - Authorization - General Authorization
  • Choose User - to Administration - System Initialization - Numbering Series


Setting Document Numbering SAP Business One

Setting Document Numbering SAP Business One

This time we will discuss document numbering. Document numbering is the Form used to setup Document numbering based on the needs of each company.

In the Document Numbering Form there are several fields that must be filled when we want to do Setup. Usually companies do setup documents every time before the beginning of the year. There are also several companies that setup monthly. Depending on the needs of each
http://karno-indonesia.blogspot.com


The fields available in the setup are :
1. Document - Displays List of Documents in SAP Business One.
2. Default Series - Displays the Default series in each document. You can change the default series.
3. First No - Displays the first No in the Series that has been default.
4. Next No - Displays the next document number when creating a new document
5. Last No - Displays the limitation of No document according to each need.

Usually used if the company wants to share document numbering per location and other things.

Setting Document Numbering SAP B1


To do the setup you can double click to the left of the document you want to setup see the picture below. For example, I took the A / R Invoice document. See the block that I gave in red
http://karno-indonesia.blogspot.com


After double clicking it will display the following image :
http://karno-indonesia.blogspot.com


In this form Setup can be done.


What must be filled and how do you fill it?

  • Name - For Naming No. of Documents to be used in Transactions (Length Field: 8 Char)
  • First No - No that will be used for the first time For a Name registered. (Length Field: 10 Char)

    Note: If the setup is done very much. And based on my experience, I recommend that Field length be filled with only 9 Char (Must be a Number)
  • Next No - automatic
  • Last No - Limit numbering for each name created. It may not be smaller than the First No that has been registered.
  • Prefix and Suffix - only as identification of the name created (Length Field: 8 Char)
  • Remarks - More detailed explanation of the Name (Length Field: 50 Char)
  • Group - Used for Authorization per Document
  • Period Indicator - Indications for determining the Period
  • Lock - Check this check box if the series is no longer used

Example:
To add a new Series, right-click Add Row or on the Toolbar (Data - Add Row)
CTRL + i Shortcut

If setup is only done per year then what should be done:
http://karno-indonesia.blogspot.com


If the Series wants to be made per location
http://karno-indonesia.blogspot.com

For Last No Primary Filled with 12009999, so as not to overlap

Notes: Sometimes SAP refuses to be updated when a user is logged in


If It's Added Click Button Update on the Series Form - Document Name - Setup.
Then click Button Update on the Document Numbering Form - Setup

Set the Default Series in the document number for the needs of Authorization per Group


1. First open the document numbering setup
2. Select the document to be setup
3. Select the Series that will be setup by clicking on the desired series row.

For example I use the 1021 series to do the default set
http://karno-indonesia.blogspot.com
4. Click the Set As Default Button on the bottom right and display the message as shown below
http://karno-indonesia.blogspot.com
Set As Default For Current User - Default series only for users who are currently logged in
Set As Default For all User - Default series for all users registered in SBO
Set As Default for Certain user - Default series for certain users only double click then see the next picture


http://karno-indonesia.blogspot.com
Check the user that will be in the default series then click the OK button


5. Click Button Update
6. Then update again. (see previous blog above)

Note: Don't forget to enter the Journal Entry Document.

Error Messages that are often found are:

1. When you want to open the Form displays an error
To generate this document, first define the number series in the Administration Module
http://karno-indonesia.blogspot.com
Solution
1. Unauthorized, Check authorization
2. No Default / Incorrect Enter Default Series


2. When finished entering the transaction then click Add Button and display the Error in the status bar
To generate this document, first define the number series in the Administration Module
Solution

1. Not Setup in the Journal Entry number document, or incorrectly enter the default entry journal

Note: 1 (One) User can only use 1 (One) Series.
Example User with the name Andi Already registered for the Java series.
And again registered for the Sumatra series, SAP will automatically retrieve the last default, namely Sumatra.

Posting Period SAP Business One

Posting Period SAP Business One

This time we will discuss how to make Posting Period SAP Business One

http://karno-indonesia.blogspot.com/

Period posts are used by the Accounting department to control transactions per period, so as to prevent any transactions that are incorrect in inputting periods. And also as the determination of when the Closing period is done. to carry out this function a new period must be made if it has not been registered before. If you look at the picture, the period is until the end of 2017.


How to make the period for 2018 ?

All you have to do is open the module administration - System initialization - post period, then the image above will appear. Then click the Button on the lower right (New Period) and produce the image below. Only users who have authorization can do this setting.
http://karno-indonesia.blogspot.com/

What fields must be filled in Posting Period?

1. Period Code: a code that will be used to determine identification. Usually I use the year as an identification so I fill it with 2013 (Length Field: 20 Char)


2. Period Name: Period name that will be used. Instead of dizziness, thinking about the name just made the same as the period code (Length Field: 20 Char)

3. Sub Period: This section must set a period to be used by your company. This Sub Period has 4 categories, namely :

  • Year: The period will be made automatically until the end of the year
  • Quarters: The period will be made per 4 Months, 6 Months and others according to the No Of Period you will choose.
  • Month: Period Per Month
  • Days: Period Per Day
  • For this example I choose Per month

4. Period Indicator:

Indicator Period refers to each series of documents (lines) that can be connected to one or more Accounting Periods. Each document series must be connected to an indicator, to activate the numbering document starting with 1 for each fiscal year. Select the period indicator to connect to the accounting period. Period indicators can be connected to more than one period in the same company

5. Period Status: Consists of 4 Parts, namely


  • Unlocked: All users can post all types of transactions for this period
  • Unlocked Except Sales: All users can post transactions for this period except sales. usually users who have this authorization will change this status at the end of each period. Why? There may still be purchases that must be ordered during this period.
  • Period Closing: All users are unable to input transactions in this period, only users who have full authorization can make transactions that are late posted.
  • Locked: There are no more transactions that can be inputted in that period. because adjustments and closures have been made

6. Posting Date From ... To ...: Post date range
7. Due Date From ... To ...: Due date range
http://karno-indonesia.blogspot.com/


UNASSIGNED LICENCE SAP B1

UNASSIGNED LICENCE SAP B1

In this discussion I will discuss how to release the license that hangs on the database.For colleagues who experience the same thing can do the steps below

SAP B1 - SQL DATABASE

1. Log in to the SAP Server
2. Open the Folder where SAP installed Default Standard is put on
C: \ Program Files (x86) \ SAP \ SAP Business One ServerTools \ License
3. Search for files with the name "B1Upf"
http://karno-indonesia.blogspot.com

4. Delete B1Upf File (If you are hesitant to delete the file you can rename B1Upf to B1Upf1)
5. After the file has been deleted, please restart the service
http://karno-indonesia.blogspot.com
6. After restarting, the license will return to normal and please reassign it according to the user.

FIX UNASSIGNED LICENCE SAP B1

SAP B1 - HANA DATABASE

1. Log in to the SAP (Linux) Server
2. Open the Folder where SAP installed Default Standard is put on :
File System / usr / sap / SAPBusinessOne / ServerTools / License / webapps / lib
3. Search for files with the name "B1Upf"
http://karno-indonesia.blogspot.com

4. Delete B1Upf File (If you are hesitant to delete the file you can rename B1Upf to B1Upf1)
5. After the file has been deleted, please restart the service in a way
Open the terminal from the File System / etc / init.d
Then right-click as shown below and select open in terminal
http://karno-indonesia.blogspot.com

6. Type ./apb1servertools restart Then press Enter, wait until the process is done as shown below
http://karno-indonesia.blogspot.com
7. After restarting, the license will return to normal and please reassign it according to the user. Hopefully this article can help colleagues.