")
WORK CENTER IN SAP PP: CREATE, CHANGE, DISPLAY (CR01, CR02, CR03)
WORK CENTER IN SAP PP: CREATE, CHANGE, DISPLAY (CR01, CR02, CR03)
Work Centers are organizational units where manufacturing activities are carried out.
In other words, the Work Center is the master data that represents the real machine, Production Line, Work Center assembly, etc. Manufacturing activities or Operations carried out at the Work Center.
The Work Center is used in the list of tasks (routing) operations and copied to the production order or process order for planning and implementing shoop floors.Data Work Centers are used for:
The Work Center is used in the list of tasks (routing) operations and copied to the production order or process order for planning and implementing shoop floors.Data Work Centers are used for:
- Scheduling When a Production Order is created, the duration of an operation can be calculated based on the operating time in the routing and the formula will be entered into the Work Center..
- Costing The cost of an operation can be calculated in the production order based on the formula entered into the Work Center. Work centers are always associated with Cost Centers
- Capacity Planning The capacities and formulas available to calculate capacity requirements are stored in the Work Center
- Work Centers are used in data routing operations.
- Work Centers are created for manufacturing plants and are identified by code
In this tutorial we will study:
- How to create a Work Center
- How to change the Work Center
- How to see the Work Center
HOW TO CREATE WORK CENTER
Step 1) From the SAP screen open transaction CR01
- Enter the manufacturing Plant code where the Work Center is created
- Enter the Work Center code.
- Enter the Work Center category as "0001" which means the Work Center will be categorized as a machine.
After filling all the fields, click  or press Enter to go to the next screen.
or press Enter to go to the next screen.
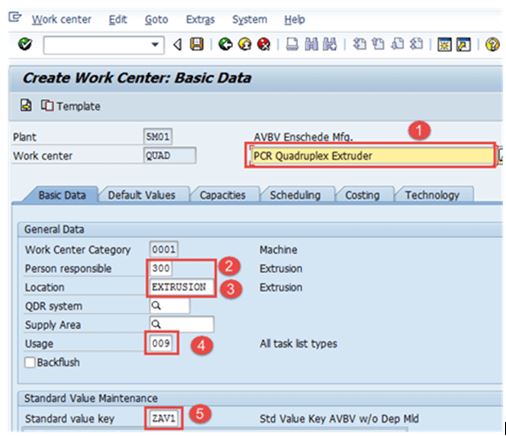
Step 2) On this screen, the Basic Work Center data will be entered as below.
- Enter the Work Center description.
- Enter the code of the person responsible for the Work Center.
- Enter the physical location where the Work Center is at the factory.
- Enter Usage as "009" which means the Work Center applies to all types of task lists such as production routes, maintenance of task lists, etc.
- Enter a standard key value that contains various types of activities used for standard cost calculations.
Step 3) On this screen under "Capacities Tab."
- Enter the Capacity category as "001" which represents the machine category.
- Enter the formula process as "SAP006" - this is used to calculate capacity availability from the Work Center.
SAP006 = (Operation quantity * machine time) / base quantity - After filling into the capacity category and processing the formula, click on the button:

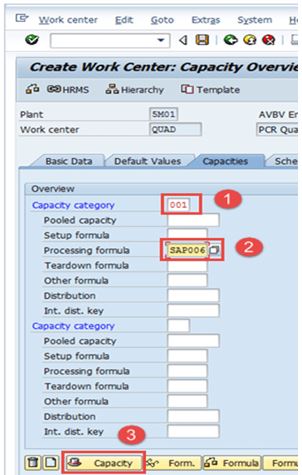
Then another screen will beopened:
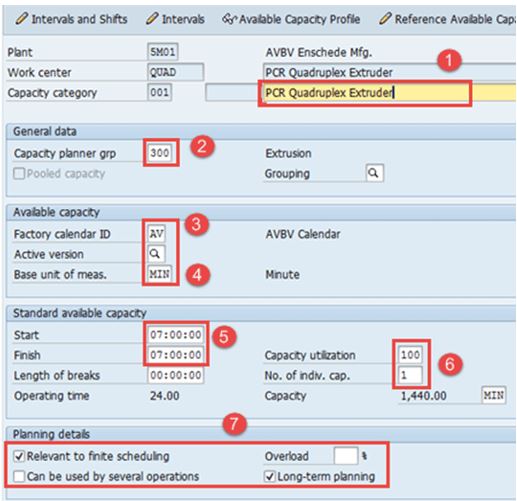
Step 4) On this screen under the Capacities Tab, capacity data will be entered.
- Enter Capacity description.
- Enter details about the "Input capacity planner group", which is responsible for machine capacity.
- Enter the factory calendar ID, which has a list of holidays for your plant. then on holidays, the capacity for the Work Center will be left blank.
- Enter the base unit of measure as "MIN" which means the work center's available capacity will be measured in i.e time. min
- Enter the time period (start and finish time) for which the Work Center will be available for operation.
- Enter the capacity utilization percentage% (how much time is used from the standard working time available) from the Work Center to consider damage and preventive maintenance of the machine. Enter the amount of capacity which means a number of similar Work Centers.
- Check "relevant for limited scheduling and" long-term planning "which shows if there is a capacity limit, the operation is moved to a certain date where it can be processed without capacity limits.
After filling all fields, click  to return to the Overview Work Center Capacity
to return to the Overview Work Center Capacity
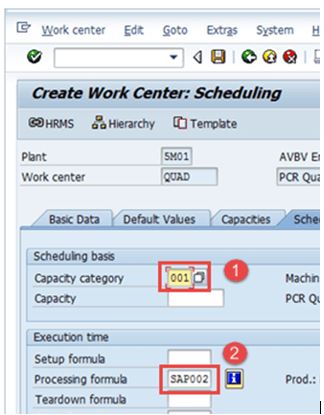
Then click the "Scheduling" tab from the menu, the system will show on the next screen:
Step 5) On the Scheduling Tab,
- Enter the capacity category with "001" which shows the machine category and hence machine time will be the basis for calculating schedule time in production orders.
- Input processing formula with "SAP002" which is used to calculate scheduling time.
SAP002 = (Operation quantity* machine time)/ base quantity/no. of splits.
After filling all the fields, click the "Costing" tab
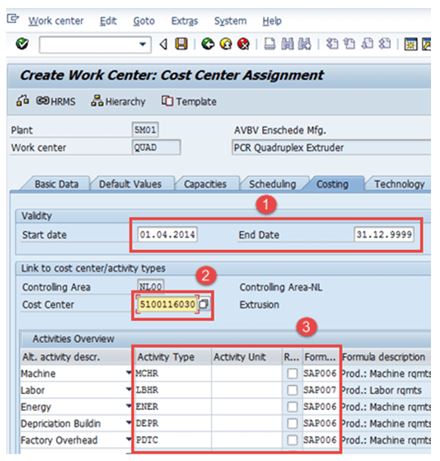
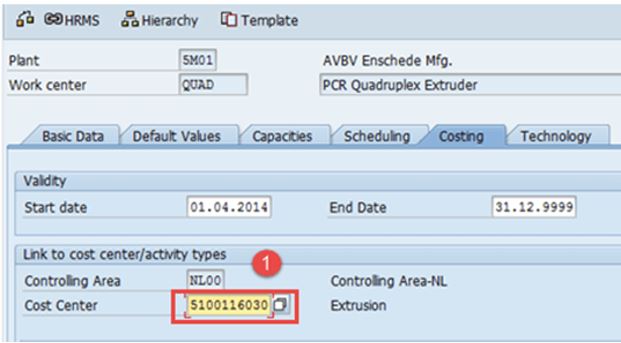
Step 6) On the Costing Tab
- Enter a Start and Finish date that shows the validity date of the cost center.
- Input center costs on operational costs to be calculated..
- Input all activity types and formulas, which will be used to calculate activity costs.
Click the button  to save the new Work Center. The system will give a message in the lower left corner.untuk save Work Cente
to save the new Work Center. The system will give a message in the lower left corner.untuk save Work Cente HOW TO CHANGE THE WORK CENTER
We need a change in the work center if the cost center assigned to the work center has been changed by the finance team. If the work center time available for production or% of its utilization has been changed, then we also need to make changes in the work center.
Step 1) From the SAP screen, open the CR02 transaction.
- Enter Plant Code.
- Enter the Work Center code to be changed.
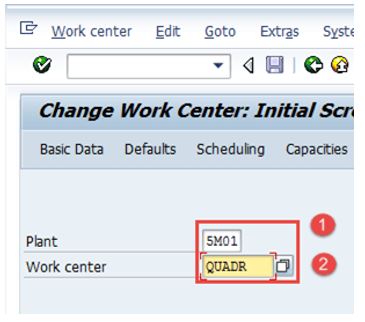
After filling all the fields, click to see the overview screen in the work center. You can also go directly to the tab that is used
Step 2)
- Change the Cost Center or make any modifications, such as when changes are available or% usage in one of the tabs.
After completing all modifications, click to Save Work Center. The system will display a message:

HOW TO SEE WORK CENTER
Step 1) From the SAP Easy Access screen open the CR03 transaction
- Enter Plant Code.
- Enter the Work Center code to be displayed
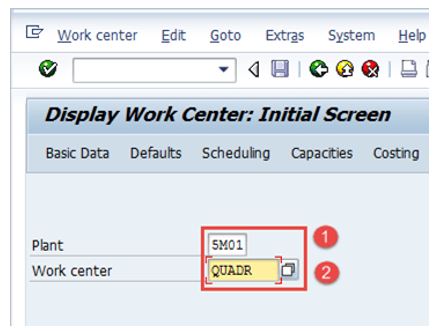
After filling all the fields, press enter from the keyboard to go to the overview screen of the work center.
You can also go directly to the tab provided for use.

Troubleshooting
There may be cases where the Cost Center does not exist. For this, you need to create a cost center and maintain an activity type - cost center relationship
If you go to the Technology tab you will get stuck / stuck in the selection of engine type, if so click to leave the tab
The person in charge, the capacity planner group will be configured in the order process by creating a work center
So, continue to another master data ...


