Showing posts with label Financial. Show all posts
Make Multiple Purchase Quotations / Purchase Orders at the Same Time from the "Purchase Request Report"

Make Multiple Purchase Quotations / Purchase Orders at the Same Time from the "Purchase Request Report"

Purchase Request is a purchase request at a company which, if approved, will be further processed into a Purchase Quotation / Purchase Order.
SAP Business One has the 'Purchase Request Report' feature, which is used to view Purchase Requests that have been made by Users / Employees. In addition to viewing Purchase Requests, the Feature also allows Users to directly create multiple Purchase Quotation / Purchase Orders.
Purchase Request Report is on the Menu:
Purchasing - A / P> Purchasing Reports -> Purchase Request Report.
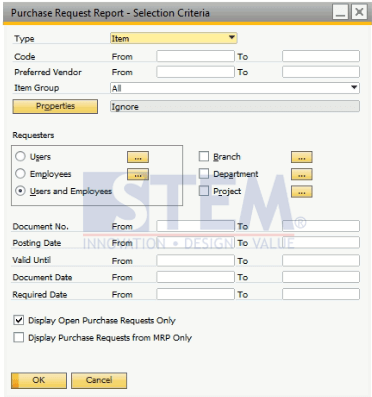
Select the desired criteria, then press OK, the information will appear according to the criteria selected.
  • Choose Type: [Item / Service]
  • Item Type: For purchasing items, can be filtered again according to Item Code, Preferred Vendor, Item Group, or Properties.
  • Requester make it possible to only view Purchase Request Documents, from certain Users, Employees, Departments, or Projects.
  • Other Information Apart from Type and Requester, Information can also be filtered from the Document Number, Document Date, and Date of Requirement.
  • Check Display Open Purchase Request Only To display only the Purchase Request documents that have not been processed
  • Check Display Purchase Request from MRP Only To display only Purpose Request documents from the MRP Process
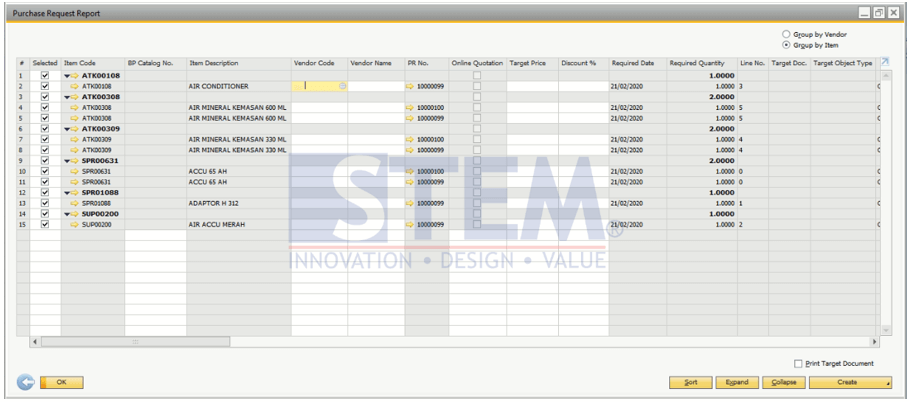
Select all Items to be processed as Purchase Quotations / Purchase Orders, select Vendors and enter the required information such as prices or discounts.
Press the Create Button and Select Purchase Quotations / Purchase Orders. The message "target documents will be created automatically for the selected rows" will appear, to continue Press Yes.
Purchase Quotations / Purchase Orders documents will automatically be formed based on the selected data. These documents will be merged based on the Vendor chosen.
Use of Business Partner Code in Journal Entry

Use of Business Partner Code in Journal Entry

Did you know that Journal Entry in SAP Business One can be created using the G / L Account Code and / or Business Partner Code? As a Finance / Accounting Section user of SAP Business One, posting journals is a daily job, and of course you will use both options, and it turns out there are ways that will make it easier and faster. Check out the following tips.
First tips:

Use Right Click on Mouse

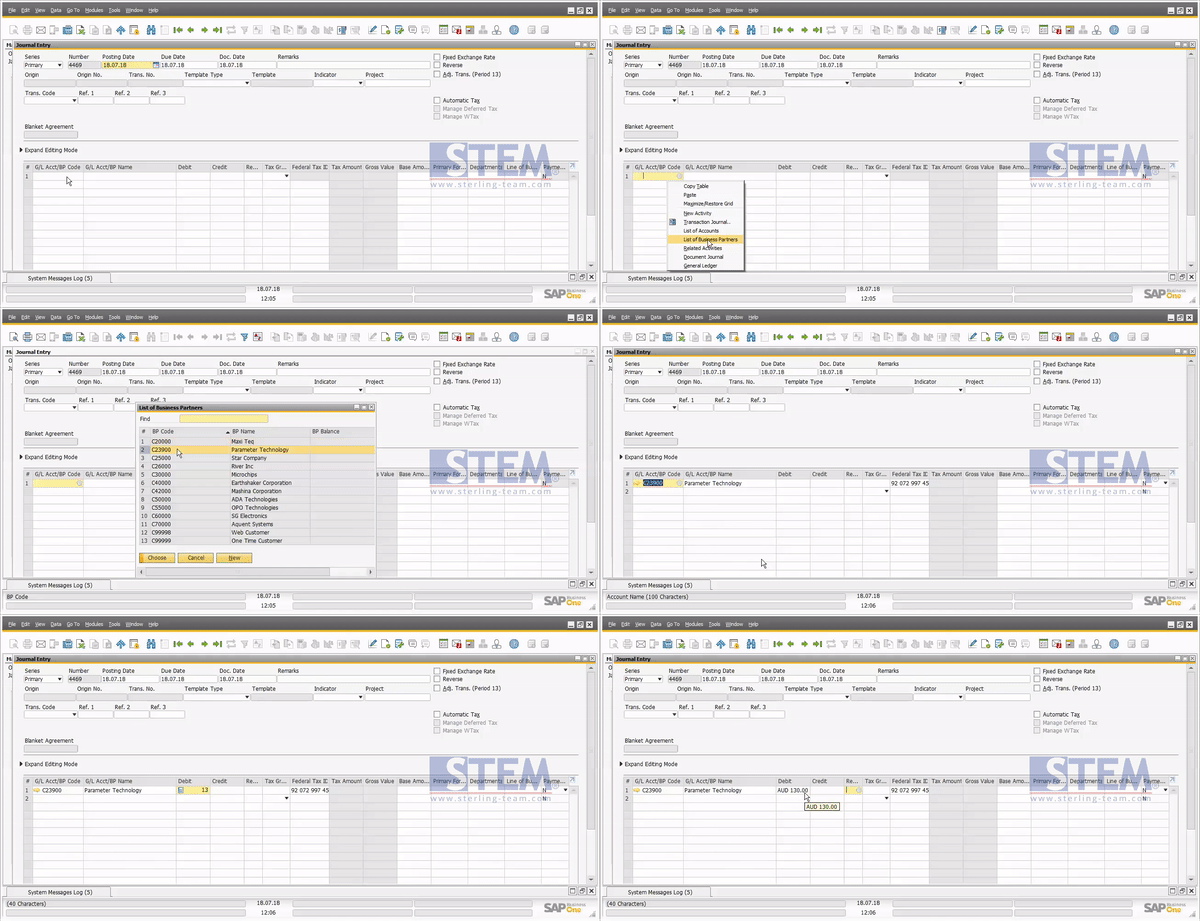
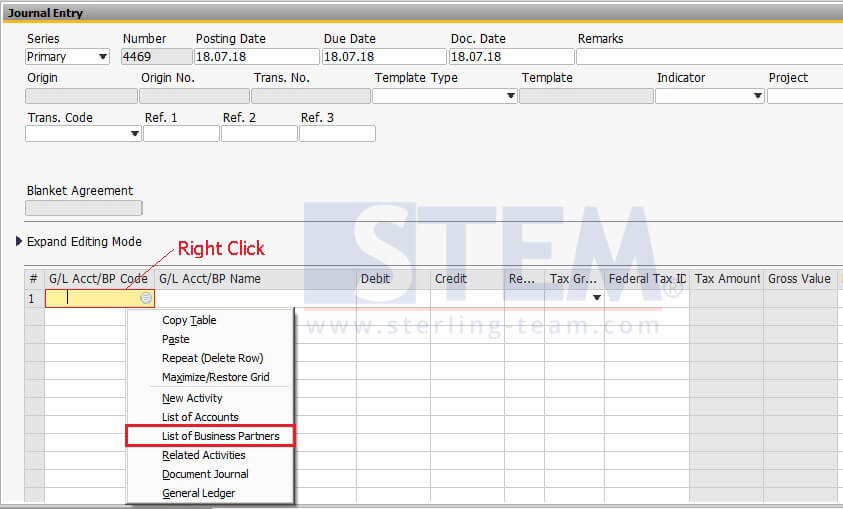
On the Journal Entry menu (Financials> Journal Entry).Please place your mouse pointer right in the "G / L Acct / BP Code" field, then, right-click and select the "List of Business Partner" option. Please select one of the BP codes in the list and continue the journal creation process as usual in SAP Business One.
Using Business Partner Code on JE Details
Right-click on the Journal Entry Menu
Let's look at another example below to make it even clearer (example BP: C23900 - Technology Parameters):
Using Business Partner Code on JE
How to use BP Code in Detailed Journal Entry
Second tip:

Use the "Ctrl + Tab" key combination from the keyboard

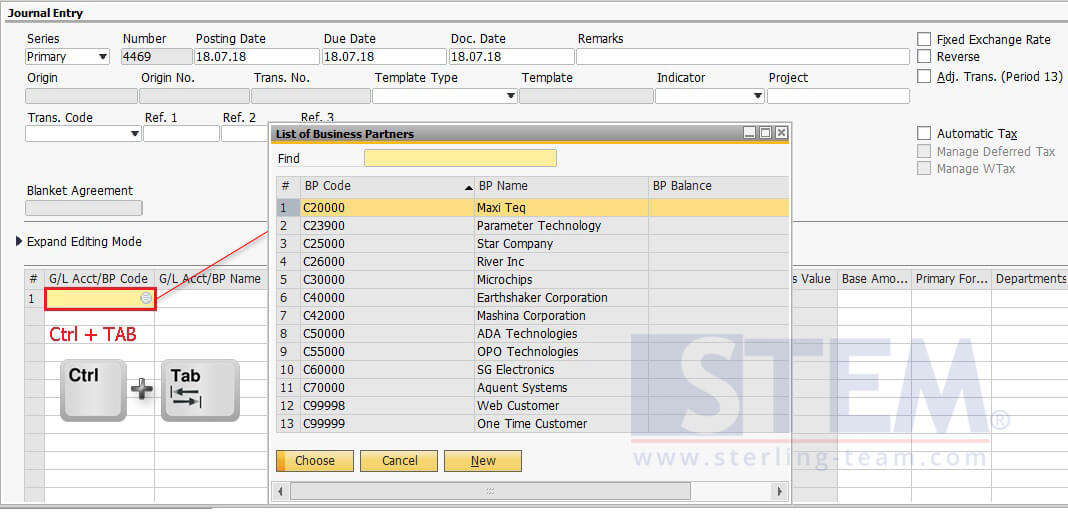
On the Journal Entry menu (Financials> Journal Entry).Make sure the active pointer position is right in the "G / L Acct / BP Code" field, if so, please press the combination of the Ctrl and Tab keys (so that both are pressed together), then after that, the "List of Business Partner" screen will appear. Select one of the BP codes that you want and continue your work as usual.
Using Business Partner Code on JE
Press the Ctrl + Tab combination to select the BP Code
These tips will help your daily work getting easier, good luck, cheers 😊
Move an Excel Journal to SAP Business One

Move an Excel Journal to SAP Business One

Looking for an easy way to enter a journal into SAP Business One? Leverage The Leverage Technologies SAP Business One journal upload / journal integration module integration is the easiest and most effective way to upload journal entries from MS Excel to SAP Business One.

You can upload Journal entries from MS Excel to SAP Business One in three simple steps:

1. Open the application Leverage Technologies SAP Business One Journal upload / journal integration in MS Excel

2. Create a Journal in Excel. The SAP Business One journaling upload application allows you to enter journal dates, journal descriptions, journal reference fields and account details. The Journal upload application allows users to enter general journals, inverting journals, journal vouchers and inverting journals.

SAP Business One Journal uploaded / journal creation application:


3. Press the "create" button on the application. The journal upload facility in The Leverage Technologies SAP Business One journal will create a journal in SAP Business One and will provide relevant journal numbers from SAP Business One. Journal has been created:

As you can see, journal entries have now been successfully created in SAP Business One. Journal created in SAP Business One: Main features
  • Journal data entry in Excel spreadsheet.
  • One button creation of SAP Business One journal entry or voucher.
  • Creation of journals and reversing journals
  • Instant notification of journal creation success or failure
  • Error reporting e.g. incorrect account codes, invalid dates etc.
  • Optional batched creation. Excel creation to journal batch scheduling

How to Use Flow Cash SAP Business One

How to Use Flow Cash SAP Business One

Cash Flow Report

Cash Flow Report Used to analyze cash flows based on income or costs such as checks, credit cards, obligations and others.

This report:
Take into account whether there are still accrued payments, and if not, the possibility of the receivables is collected.
Allows you to predict income and costs in order to make decisions.
Can increase Turnover Cash flow issued by the company whether it is in accordance with the costs incurred should
To Use Cash Flow the step that must be done is to define in advance the levels to be used, to setup it located in the Financial Module - Financial Report Template

How to fill out a Financial Report Template

Select Report to use
Select the appropriate template, if you haven't registered it can be added.

Fill in the Naming Cash Flow to be Used As needed. Like the example image above. Charging is the same as doing COA Input (Chart Of Account).
Check Text Title If Only as Header (Not Used when conducting Transactions)
To Create a Sub Level Can use the Add Child Button
For the Name of Cash Flow that will be registered in the List When conducting transactions Text Title does not need to be checked
To make a Summary for Every Cash Flow must check Sub Total
After the template, the next step is to make an update
Then the Financial Report Template for Cash Flow has been completed

The next step is to setup the Financial - Chart of Account to determine the account code that will be used for cash flow. By checking the Cash Flow then click the Update button as shown below
 After All Setups Are Made Cash Flow Can Be Used On Transactions related to Cash Accounts.
For example, I use Incoming Payment for Petty Cash Transactions
Then When Doing Payment Means Will Appear One Field containing the Cash Flow. And it must be chosen according to the transaction
After the incoming payment transaction is completed, the results can be seen in the report on the module
1. Financial - Financial Report - Financial - Cash Flow

2. Financial - Financial Report - Financial - Statement of Cash Flows


3. Financial - Financial Report - Financial - Cash Flow References Report


Please try and see the results.


 Budget Scenario Setting SAP Business One

Budget Scenario Setting SAP Business One

To Make a Budget Setting things to watch out for are

1. Setup the Module Administration - System initialization - General Settings - Budget
2. Check Budget Initialization
3. Select Option to do Block Document, Warning or no warning when the transaction has exceeded the budget limit
4. Select

  • Annual Budget - Annual budget arrangements are made for each user
  • Monthly budget - Monthly budget budget settings for all users After logging back from SBO.

5. Check One or more transactions that will be given a warning, or block when making transactions that have exceeded the budget limit
The next step is to setup the Financial module - Budget Setup - Budget Scenario
Budget Name: Naming in accordance with the budget scenario in the current year. Naming Must Be Unique
Based On: Budget scenario that forms the basis of the budget scenario set. An independent budget scenario must be based on itself.
Initial Ratio: To set the percentage of the budget set based on the basic budget. If the Budget Scenario is based on itself, the initial ratio must be 100%
Rounding method: Rounding method for Amount budget in each scenario

How to input in Scenario Can be done in 2 ways
1. Right Click then Add Row
2. In the Data Bar Menu - Add Row (Ctrl + i)


Budget Distribution Method Is the method used for budget distribution. For Defaul System 3 methods have been used to use. The method is Equal, the amount of the budget is distributed evenly between 12 months

 Ascending Order, the Budget is distributed in such a way that most of it is dedicated for the last months, and only a small portion is used during the first months.
Descending Series, Budgets are distributed in such a way that most are dedicated to the first months of this year, and the amount set for each month decreases as the year progresses
You can add other methods if needed (manually), allowing you to manually determine how the budget is distributed between different months. You can, decide that the budget is distributed between just two months.

The next step is to fill the budget on the account that will be used.
The trick is to open the Financial module - setup budget - Budget
Select Scenario which will be used to determine the Budget filling
Select the account to be inputted with the budget.
click the OK button
Budget amount in local currency.
Debit, Budget calculation is always done on the debit side.
Credit, Amount of budget for incoming payment accounts, for reporting purposes only.
Actual, Actual amount of budget that has been used


The above example is the division of the budget using the Equal Method where the Budget is evenly distributed in 12 Months, For More Details or want to change the method used you can simply double click on the no on the left
You can change it if the budget wants to use the manual method, for example for January I want to give a budget of USD 900.


After the Budget Setup Is Done Now is the time for you to try to make transactions related to the account that has been setup. Continuation will be added later

For videos, please see this link http://www.youtube.com/watch?v=m9T0cPywUwg